Sign Up
You are not currently logged in. Please log in to CEUfast to enable the course progress and auto resume features.

Course Library

LPN IV Series: Venipuncture and Maintenance

4 Contact Hours
CEUfast OwlGet one year unlimited nursing CEUs $39Sign up now
This peer reviewed course is applicable for the following professions:
Licensed Practical Nurse (LPN), Licensed Vocational Nurses (LVN)
This course will be updated or discontinued on or before Thursday, March 27, 2025

Nationally Accredited

CEUFast, Inc. is accredited as a provider of nursing continuing professional development by the American Nurses Credentialing Center's Commission on Accreditation. ANCC Provider number #P0274.


This course does not meet the Florida LPN IV Certification requirement.
Outcomes

≥92% of LPNs will know how to perform venipuncture and maintain an IV site.

Objectives

After completing this continuing education course, the participant will be able to meet the following objectives:

  1. Examine the structure of the vascular system.
  2. Compare the types of blood tests that can be performed with venipuncture.
  3. Determine how to insert an intravenous (IV) catheter correctly.
  4. Calculate flow rates correctly.
  5. Outline maintenance of an IV catheter.
  6. Summarize the assessment of an IV catheter.
  7. Identify complications of venipuncture and IV therapy.
  8. Evaluate venipuncture procedures in children.
CEUFast Inc. and the course planners for this educational activity do not have any relevant financial relationship(s) to disclose with ineligible companies whose primary business is producing, marketing, selling, re-selling, or distributing healthcare products used by or on patients.

Last Updated:
  • $39 Unlimited Access for 1 Year
    (Includes all state required Nursing CEs)
  • No Tests Required
    (Accepted by most states & professions)
  • Instant Reporting to CE Broker
  • Instant Access to certificates of completion
Logo Audio
Now includes
Audio Courses!
Learn More
To earn a certificate of completion you have one of two options:
  1. Take test and pass with a score of at least 80%
  2. Attest that you have read and learned all the course materials.
    (NOTE: Some approval agencies and organizations require you to take a test and "No Test" is NOT an option.)
Authors:    Desiree Reinken (MSN, APRN, NP-C) , Julia Tortorice (RN, MBA, MSN, NEA-BC, CPHQ)

Introduction

Often, a patient will need venipuncture for some reason. They may need routine labs drawn, they may be suffering from a chronic illness, or they may be acutely ill. Regardless of the reason behind venipuncture, specific content must be reviewed.

First off, the anatomy of the skin and veins must be discussed. Understanding veins, how they work, and where they lead is essential.

It is also essential to understand the types of blood tests that can be commonly performed and what each test will tell us, such as how organs are functioning.

The steps of inserting a needle and IV catheter are outlined, including the necessary equipment and techniques to ensure venipuncture and IV success. The course will also outline the assessment, maintenance, and documentation of the venipuncture and IV procedure.

Steps for adults versus pediatric IV and venipuncture are discussed as the process can differ depending on the patient's age.

First, let's discuss the skin and veins to gain a foundational understanding to increase the chances of venipuncture success.

Venipuncture Site

The skin acts as a barrier between the outside environment and internal organs. When the barrier is broken, the risk of infection increases. An infusion access device perforates the skin, interrupts the integrity of the barrier, and increases the risk of infection. Any infection in this tissue can spread throughout the body. A strict aseptic technique for venipuncture care and site maintenance is necessary (Rosso et al., 2016).

  • The vascular system comprises blood vessels, including arteries, arterioles, capillaries, and veins. These vessels vary in size and function.
  • Arteries carry oxygenated blood away from the heart. The aorta is the largest artery emanating from the heart. Arteries branch off the aorta. As they branch off the aorta, they decrease in size and become arterioles. Arterioles subdivide into capillaries.
  • Capillaries provide nutrients to the tissue and take waste away. Capillaries connect with venules, which are the smallest veins. The venules connect with larger veins, eventually leading to the vena cava, the largest vein that connects directly to the heart.
  • Veins carry deoxygenated blood back to the heart. The deoxygenated venous blood is carried to the right atrium through the superior and inferior vena cava. The blood enters the right ventricle, exiting through the pulmonary artery to the lungs, where it is oxygenated and carried to the left atrium through the pulmonary veins.
  • The pulmonary artery carries deoxygenated blood, and the pulmonary veins carry oxygenated blood; these are the only exceptions to the rule that an artery contains oxygenated blood and a vein carries deoxygenated blood (Tucker et al., 2022).

Heart Circulation

Heart Circulation

Blood Tests

Various blood tests can be run to diagnose and manage certain illnesses. Venipuncture is performed to acquire blood for these lab tests, so they are worth reviewing (National Heart, Lung, and Blood Institute, 2022).

Antinuclear Antibody: This test measures antibodies in patients with rheumatic disease.

Blood Chemistry Studies: This test, also called a chemistry panel, measures chemicals in the body that help to show how everything is functioning. Blood chemistry studies may look at various items, such as hormones, vitamins, proteins, minerals, fats, and electrolytes, which are crucial in keeping the body functioning adequately.

Electrolyte panels are an example of a blood chemistry test. Electrolyte panels examine specific electrolytes such as magnesium, sodium, and potassium.

Renal panels are performed to look at specific functions of the kidney. Blood urea nitrogen (BUN) and creatinine are examples of tests on a renal panel.

A basic metabolic panel (BMP) looks at glucose, calcium, and the same items on a kidney function test and electrolyte panel.

A comprehensive metabolic panel (CMP) includes the same as a BMP, but also includes liver function tests.

Blood Lipid Profile: This test is also called a cholesterol panel, a lipid test/profile, or a coronary risk panel. The blood contains lipids or fat molecules. An increase or buildup of lipids in the arteries and vessels can increase a patient's risk of a heart attack or other cardiovascular complications.

There are five lipids measured in a blood lipid profile. They include:

Low-density lipoprotein (LDL): This is the bad form of cholesterol. When it builds up in the heart, it increases the chances of cardiovascular events occurring.

Very-low-density lipoprotein (VLDL): This form of cholesterol is usually low when patients are fasting as it comes from food intake. If it is high while the patient is fasting, lipid metabolism may not be functioning correctly.

High-density lipoprotein (HDL): This is the good cholesterol. It prevents the bad cholesterol from building up in the arteries and vessels.

Total cholesterol: Overall cholesterol levels that include HDL, VLDL, and LDL.

Triglycerides: This is from the intake of food. Intaking a lot of bad foods will cause an excess amount of triglycerides, increasing the risk of heart problems and an inflamed pancreas.

B-type Natriuretic Peptide (BNP): This test measures this specific hormone and provides information on the functioning of the heart. Higher levels may mean the heart is not pumping adequately and blood is not getting to the areas it should be. An elevated BNP could also mean the kidneys are not working as they should.

Complete Blood Count (CBC): This is a very common test that measures specific details about blood cells. It looks at the number of blood cells, size, and maturity. Abnormal results can mean different things. A low number of red blood cells may mean the patient is anemic. A high white blood cell count may mean the patient has an infection. Abnormal platelet results may also mean some form of infection.

Creatinine: This test evaluates how the kidneys are functioning and if there is any evidence of disease.

C-Reactive Protein (CRP): This test reflects the liver as this protein is made in the liver. If an increased amount of CRP is found in the blood, it may indicate inflammation of some kind.

Erythrocyte Sedimentation Rate (ESR): This test is also called the sed rate and helps to show any inflammation in the body. It looks at the clumping of the red blood cells and the distance these cells fall in a tube within 60 minutes. The closer the red blood cells are to the bottom of the tube, the greater the body's inflammatory response.

Hematocrit: This test measures the amount of red blood cells in the blood.

Liver Function Tests: Many liver function tests can be performed to check the enzymes in the liver for evidence of any damage or disease.

Alanine transaminase, or ALT, helps the liver use proteins for energy. When ALT levels are increased in the blood, it may indicate the liver has some damage.

Aspartate transaminase, or AST, metabolizes amino acids. Increased levels of ALT may also indicate liver damage.

Alkaline phosphatase, or ALP, assists the liver in breaking down proteins. High levels of ALP in the blood may indicate the liver is damaged or diseased.

Albumin is an important protein in the liver used to fight infections. Low levels of albumin and total protein may indicate there has been some damage to the liver.

Bilirubin is produced when red blood cells break down. If there are elevated levels of bilirubin, it could indicate liver damage or even anemia.

Rheumatoid Factor: This test specifically measures the amount of rheumatoid factor, a type of protein, that is in the blood. Increased rheumatoid factor levels are associated with autoimmune diseases. An example of a disease with a high rheumatoid factor is rheumatoid arthritis. However, high levels have also been found in healthy patients with no identifiable cause.

These are just some examples of common blood tests. There are many others out there that are used to help identify diseases and diagnose patients.

Tubes for Venipuncture

There are different colored tubes that are used with venipuncture. Each tube has a colored top, which indicates the additive, and what the tube tests for (University of North Carolina [UNC] Medical Center, 2021).

Purple top: The tube with the purple top contains an anticoagulant called ethylenediaminetetraacetic acid or EDTA. EDTA binds to calcium which prevents clotting. The purple top tubes are also used in comprehensive tests when whole blood is required.

The purple top may test for:

  • ESR
  • CBC
  • Hemoglobin A1C, which is a cumulative glucose test.

Ensure the blood is mixed with the coagulant; this is usually performed by a centrifuge for eight minutes.

Pink top: The tube with the pink top is similar to the purple top. It also contains EDTA, but it is used more with blood analyses for blood transfusions. It allows for examining blood types for comparison to other types, also called cross-matching. It also requires mixing with the added anticoagulant for eight minutes in the centrifuge.

Blue top: The tube with the blue top is used for various hematology tests. It contains sodium citrate, which binds to calcium and prevents coagulation. Therefore, the blue top tube is used in blood clotting tests that look at the bleeding time and coagulation studies, such as the D-dimer.

The blue top tube requires filling to its limit; it may not be useful if not filled fully.

Yellow top: The tube with the yellow top is often used for blood chemistry tests looking at hormones. Any test that depends on the separation of the serum of the blood is performed with a yellow top tube. The silica particles in this tube separate the red blood cells from the plasma. The blood serum is separated in a centrifuge, and the top portion or layer will become yellow.

Tests performed with the yellow top include:

  • Cortisol, sex hormones, and other endocrine tests
  • Immunology and microbiology tests
  • Tumor marker analyses
  • Blood toxicology screens
  • Biochemistry analyses of the thyroid, vitamins, kidney and liver function tests, and fats.

Gray top: The tube with the gray top is not used very often because the yellow top tube also includes the same tests plus more—the gray top tube just tests for lactate and blood sugar. The gray top tube contains sodium fluoride, ensuring there is no sugar breakdown in the sample. It also contains potassium oxalate, which acts as an anticoagulant.

Red top: The tube with the red top is also not commonly used. When it is used, it tests for hormones and toxicology screens. However, the yellow top tube can also test for all of this and more.

Dark green top: The tube with the dark green top is not used very often. It requires heparinized plasma or whole blood. It contains sodium heparin, which acts as an anticoagulant. Common tests used with the green top include:

  • Ammonia
  • Insulin
  • Aldosterone
  • Renin

Light green top: The tube with the light green top is used in biochemistry tests as it contains lithium heparin to collect heparinized plasma.

Blood Cultures

At times, the collection of blood cultures must occur. Blood cultures help determine if there are pathogens of bacteria in the blood that is supposed to be sterile and free of infection.

A sterile solution, such as Betadine, should be used when drawing blood for cultures. It should also be performed using sterile gloves and a sterile technique, ensuring that nothing is contaminated. Contamination can result in endocarditis, an infection in the heart's lining. The tops of the blood culture bottles or containers should be disinfected.

The blood culture bottles are similar to vacuum tubes but are shaped differently. A special media in the blood culture bottles preserves aerobic or anaerobic microorganisms, and each is tested. The aerobic bottle is filled first, and the anaerobic bottle is filled second. However, the anaerobic bottle should be filled first if a syringe is used. However, most blood culture bottles have been designed so that collection via a syringe is unnecessary. The bottles have longer necks that fit into the tube holders commonly used for regular blood draws (Ombelet et al., 2019).

Collecting the right amount of blood is necessary to test for microorganisms. Around 10 mL of blood is common. However, it depends on the facility protocols, the manufacturer, and the collection method. Around 5 mL may be required for pediatric patients. If insufficient blood is collected, microorganisms may not grow properly, and a diagnosis may be missed. The same may occur if too much blood is collected.

After collection, the bottles are placed in a special incubator for 24 hours. After 24 hours, they are analyzed. During this time, bacteria tend to multiply and grow. Commonly, bottles have an indicator that changes color when bacteria grows in the samples (Lamy et al., 2016).

Now that we have discussed venipuncture tests, let's proceed to the insertion process.

Inserting the IV Catheter

IV therapy is an invasive procedure. Only veins are used for venipuncture. If blood pulses out of the catheter, you have hit an artery. Discontinue the catheter and hold pressure for 10 minutes.

Alert: Aseptic technique should be used on all venipunctures, tubing, and dressing changes.

Before you begin the venipuncture, consider the following:

  • The purpose
  • Duration of use
  • Condition of veins
  • Type of infusion
  • Patients medical condition

When selecting a vein to perform venipuncture, consider the following factors:

  • Catheter size - Select a catheter with the shortest length and diameter that accommodates the provided therapy. A 20-gauge (20G) catheter can be used for blood transfusions if the patient cannot tolerate an 18G. Smaller catheters lyse the red blood cells during infusion, defeating the purpose.
  • Type of solution - Hypertonic solutions and various medications can irritate the vein. Consult with the pharmacy regarding the properties of the medications or solutions being delivered.
    • Alert: Do not administer continuous vesicant chemotherapy and parenteral nutrition exceeding 10% dextrose or 5% albumin in a peripheral line. A 20G or larger catheter is needed in the forearm or above for IV contrast.
  • The vein condition - If the vein has recently been used or is bruised/red/swollen, do not use it.
  • Duration of therapy - Long-term therapy will require frequent venipunctures. When possible, alternate arms and always start distally.
  • Patient's age:
    • Infants have fewer accessible sites than older children and adults.
    • In toddlers, the feet and hands are the most accessible sites.
    • The hands and the antecubital region offer the best sites for children, adolescents, teens, and adults.
    • The elderly may have very fragile veins, fragile valves, and a lack of connective tissue to stabilize the veins (rolling veins).
  • Patient preference - Use the non-dominant side whenever possible. Ask the patient if they have ever had an IV before and which site they prefer.
  • Patient activity – Consider other placement beside the hand if the patient uses a walker, crutches, or wheelchair (Nettina, 2019).

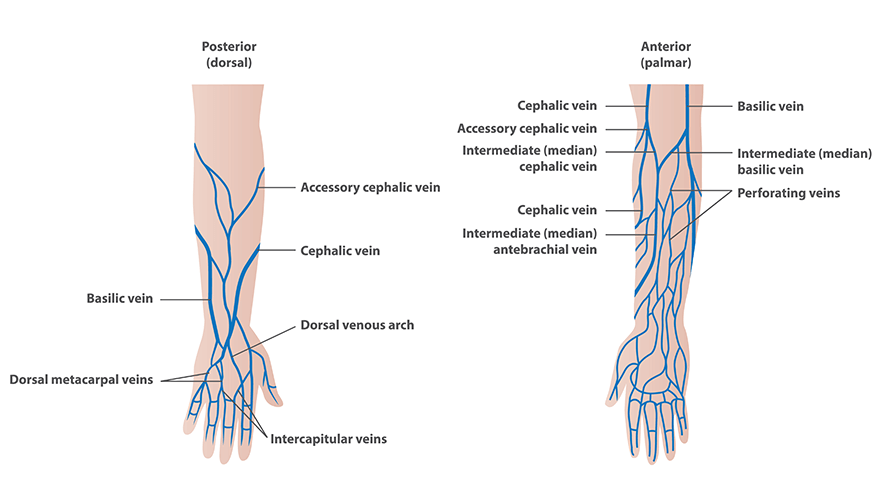
Veins for Venipuncture

Veins for Venipuncture

Venipuncture Sites: Advantages vs Disadvantages (Nettina, 2019)
SiteAdvantagesDisadvantages
Back of Hand
  • Metacarpal veins
  • Easily accessible and visualized
  • Catheter lies flat on back of hand for stabilization
  • Allows successive IVs further up the arm if needed
  • Painful during insertion due to large number of nerve endings in hands
  • Phlebitis likely at site
  • Discomfort during movement if located near bend of wrist
  • Must avoid digital veins
  • Use a non-dominant hand if possible
  • In the elderly or chronically ill, the veins on the back of the hand may look good, but may not be patent (sclerosed)
  • If you puncture a valve, the vein is likely to rupture (blow)
Forearm
  • Accessory cephalic vein - Along radial bone as a continuation of metacarpal veins of the thumb
  • Cephalic vein - Along radial side of forearm
  • Larger veins
  • Allows rapid infusion
  • More tolerant of caustic substances
  • Can use large gauge catheters
  • Does not impair mobility
  • Well supported by subcutaneous tissue
  • Danger of radial nerve injury
  • Discomfort during movement if located near the bend of the elbow
Inner wrist
  • Median antebrachial vein
  • Holds butterfly (winged) needles well
  • It can be used when no other means are available
  • Easily visualized
  • Very painful insertion due to nerve endings in the area
  • High risk of infiltration in this area
  • Possible nerve damage due to infiltration
Inner Elbow
  • Antecubital veins - In the antecubital fossa: median cephalic, median basilic, medial cubital
  • Large veins
  • Allows rapid infusion
  • More tolerant of caustic substances
  • Can use large gauge catheters
  • Used frequently for drawing blood
  • Visible or palpable in children when other veins will not dilate
  • Used in emergencies
  • It can be used when no other means are available
  • Restricted elbow motion
  • Difficult to splint elbow
  • It infiltrates easily if the elbow moves a lot
  • May prevent successive IVs below lower on the arm
  • Veins may be sclerotic if blood has been drawn frequently from this site
Scalp Veins
  • Works well in infants
  • Easy to puncture an artery instead of a vein
  • Difficult to stabilize catheter
Ankles and Feet
  • Works well in toddlers
  • Difficult to stabilize catheter
  • Easy for toddler to pull out
  • Do not use on anyone older than a toddler because of the increased risk of phlebitis, thrombosis, and infection

Central lines should be used (Nettina, 2019):

  • When infusions are:
    • Hypertonic
    • Highly irritating (chemotherapy, parenteral nutrition)
    • Required rapid or high-volume
  • When peripheral blood flow is diminished (shock, dehydration)
  • When peripheral veins are not accessible (obese, frequent venipuncture)
  • When hemodynamic monitoring is desired
  • When long term IV therapy is expected

Central lines will be discussed in another course in this series.

Types of Catheters (Nettina, 2019)
CatheterPurposeMax flow rateVolume
  • 24 G
  • Color: Yellow or lime
  • Infants
  • Pediatrics
  • Elderly
  • Difficult venous access
23 mL/minSmall
  • 22 G
  • Color: Blue
  • Infants
  • Pediatrics
  • Elderly
  • Small veins
22-50 mL/minSmall
  • 20 G
  • Color: Pink
  • Adult
  • Most infusion types
55-80 mL/minMedium
  • 18 G
  • Color: Green
  • Fluid replacement
  • Blood Transfusion
  • Contrast-based radiographic tests
100-120 mL/minLarge
  • 16 G
  • Color: Gray
  • Rapid fluid replacement
  • Blood transfusion
150-240 mL/minLarge
  • 14 G
  • Color: Orange or brown
  • Rapid fluid replacement
  • Blood transfusion
250-300 mL/minExtra large
  • 18 G
  • Triple-lumen
  • Color: Medial (blue) and proximal (white)
  • Fluid replacement
  • Blood transfusion
  • Medication administration
26 mL/minLarge
  • 16 G
  • Triple-lumen
  • Color: Distal (brown)
  • Fluid replacement
  • Blood transfusion
  • Medication administration
  • Hemodynamic monitoring
52 mL/minLarge

Butterfly (winged) metal needles are for short-term drug administration and should not be left in place. The needles easily cut the vein and lead to infiltration with the slightest movement.

Use only catheters with a safety protection feature to guard against needlesticks (Nettina, 2019).

Equipment

Depending on the insertion being performed, the equipment can differ.

If using safety needles, a 22G or less will be needed. If using butterfly needles, a 21G or less will be needed.

Syringes, a transfer device, a vacutainer tube holder, and blood collection tubes will also be necessary. Vacuum tubes withdraw a specific amount of blood that is predetermined.

Other equipment includes a tourniquet, alcohol wipes, gauze, a sharps disposal container, and bandages/tape (Nettina, 2019).

Preparing the Site

  1. If the site is dirty, clean the area with soap and water.
  2. Clean the IV site with a topical antiseptic according to your facility protocol. Consider the patient's skin and allergies when picking the antiseptic.
    1. Betadine is often used. Some wipe the betadine off with alcohol.
    2. Chlorhexidine is recommended.
      1. Alert: Chlorhexidine can burn or irritate the skin of infants under two months old.
  3. Use the antiseptic in an outward, circular scrubbing motion. Clean from the center out. The gauze used on the outer side of the area is contaminated. If you use that gauze to clean the center again, you have contaminated the site.
  4. Allow it to dry completely (Nettina, 2019).

Angles

The shallower the veins, the sallower the insertion angle must be.

IV insertions into the hand should be done at 10-20°. The deeper the vein, the steeper the approach could be. A deep vein should be done with at least a 20-30° angle.

Shallow attempts can be painful for the patient, often resulting in a second stick and tissue damage. However, starting too steep can cause the needle to go through the vein and blow it. As veins in patients differ for everyone, an individual approach is necessary. The vein should first be identified before deciding the angle.

Hand veins can be quite shallow. If necessary, start at 20-30° to break the skin, then change the angle to 10-20° to follow the vein.

Arm and leg veins have more tissue, and insertion should begin at a 20-30° angle.

The antecubital fossa vein is much deeper. It is possible to start at 20-30° to break the skin and then change the angle to 40-45° (Beecham & Tackling, 2022).

Methods to Distend a Vein

  1. Apply a tourniquet at least 2-6 inches above the planned insertion site. Fasten the tourniquet with a slipknot or hemostat. A blood pressure cuff can be used as a tourniquet. The goal is to impede venous flow while allowing arterial flow. A looser tourniquet is effective in patients with fragile veins.
  2. Apply manual compression above the site by placing fingers on the vein. This procedure usually takes two people to do. The method is particularly effective in the elderly, diabetic, or chronically ill whose veins are fragile.
  3. Position the arm lower than the heart level while the patient opens and closes their fist;  lightly stroke the vein downward.
  4. Lightly tap the vein. Be gentle, so the vein is not damaged.
  5. Apply warmth to the site using a dry, warm towel or heat pack.

There are other techniques that can be used. 

Ultrasound-guided venipuncture improves efficiency and effectiveness (Nettina, 2019).

To reduce pain during venipuncture, penetrate these layers quickly.

Local anesthetic agents can be used to minimize pain. These include:

  • Topical vapor coolant sprays
  • Topical transdermal agents
  • Intradermal lidocaine
  • Pressure-accelerated lidocaine

The anesthetic decreases pain but may cause the vein to collapse (disappear) or cause an allergic reaction. A warm compress may decrease the vasoconstrictive effect of the local anesthetics.

The IV catheter and tubing should be secured to prevent dislodging and irritation at the catheter site. The facility usually determines the IV site dressing and stabilization device. A transparent semipermeable dressing and tape are often used. More reliable devices are made but may not be used by your facility. Be sure to tape the tubing to the skin several inches above the insertion site to prevent dislodging when manipulating the fluid bags or pumps (Bond et al., 2016).

Gravity can be used to increase the flow of blood to the arm or hand. Have the patient lie flat on the bed as their arm dangles down. They can pump the vein by slowly squeezing the first and allowing an increase of blood flow to come to the insertion site. Patients can also use a windmill technique by carefully swinging their arm around several times; the centrifugal force dilates the vein, increasing blood flow (Lee et al., 2020).

Hydration is critical when performing venipuncture. The veins are more likely to dilate when the body is hydrated. If the venipuncture can be planned, ensure the patient hydrates beforehand.

Nurses should assist with ensuring the patient is relaxed. Tension and stress can constrict the veins, limiting the potential of successful venipuncture or infusion.

No Flashback

The patency of a catheter can be checked by assessing the blood return. The blood return, or flashback, should appear the same as other blood in color and consistency. No specific amount of blood or return is necessary to determine the patency.

Sometimes, a blood return does not occur. Instead of immediately discontinuing the insertion, some techniques can be tried to create a flashback or ensure the catheter is patent.

A slow and gentle approach should be used to get a flashback. Pulling too quickly or with too much force can damage the vein.

It is possible the syringe could be the problem. A smaller syringe, 5 mL compared to 10 mL, will generate less force and may produce a flashback.

Position changes may cause a flashback; the catheter may have been against the vein wall.

If it is a peripheral IV, try placing the tourniquet on the same arm above the catheter, then try to aspirate again.

If none of these tips work, likely, the catheter is not functioning correctly, possibly due to it being in an incorrect position. Assess the site for redness, swelling, or fluid leakage.

The catheter should be flushed with normal saline (NS). If it meets resistance during this flushing, there is a problem. The area near the insertion site should be palpated before and during the flushing. If the patient complains of pain, the process should be stopped. If the flush cannot be felt going through the vein or the fluid stays at the tip of the catheter, it is malfunctioning or incorrectly placed.

The patient will feel all of this that is going on. They are a key resource to let you know if something is going awry with the venipuncture. Complaints of pain in other areas of the body, especially when flushing a central venous catheter, could indicate a location or catheter issue.

Before administering fluid or medication through the catheter, its patency and any signs and symptoms of complications should be assessed. Also, ensure that a blood return can still be easily obtained (Nettina, 2019).

Tubing

Use an aseptic technique when changing tubing and bags or bottles. The system can be set up in the medication room or at the patient's bedside. Most medication rooms have enough room to lay out the equipment and control the sterile ends of the bags, bottles, and tubes.

Use only bags or bottles that are sealed and within the expiration date. If the contents of the bag or bottle of IV fluid are cloudy or not the color it is supposed to be, do not use it. The addition of medication or parenteral nutrition may change the color. These additions should be noted on the bag by the pharmacy or by the nurse who added the substance.

Microdrip systems deliver 60 drops/mL. It is used when infusing small volumes. It is commonly used with infants and pediatrics. Microdrips reduce the risk of clotting in the line because of the slow infusion rate. It also provides fluid overload safety by restricting the maximum amount infused. Microdrip systems may have a drip chamber that contains up to 100 mL and is clamped off from the liter bag of fluids. The restriction is an additional safety measure to prevent fluid overload in at-risk patients (Nettina, 2019).

Macrodrip systems deliver 10, 15, or 20 drops/mL. 20 drops/mL is the most common type. Most facilities use a standard macrodrop size to prevent potential errors. Macrodrips are used in most adults for large quantities and rapid infusions. Most IV bags and glass bottles have a built-in air vent to prevent a vacuum. If a glass bottle has no vent built-in, vented tubing can be used. Most facilities standardize their bags or bottles to avoid problems, but most facilities use bags.

Filters are usually built-in lines used for blood or parenteral nutrition. Some filters can be added between the tubing and the IV bag. Most facilities standardize to avoid problems. If you need a special filter for blood infusion, the blood bank will provide that add-in filter or special tubing with a built-in filter.

Most infusion pumps require special tubing. The facility will standardize this tubing as well. Secondary administration tubing is used to piggyback IV medication bags to infusion tubing. The medication bag should always be hung higher than the IV-liter bag (Nettina, 2019).

There is specially coated tubing that prevents the leaching of polyvinyl chlorine from the tubing. The coated tubing should infuse nitroglycerin, paclitaxel, and cyclosporine.

Tubing add-in devices are available. They include:

  • Single and multi-lumen extension sets
  • Extension loops
  • Needleless connectors
  • Inline filters
  • Manual flow-control devices
  • Stopcocks

Minimize tubing manipulation and multiple components in the tubing to reduce the chances of contamination.

The frequency of changing the IV administration sets is specific to facilities. The following are evidence-based recommendations for changing schedules. Primary and secondary continuous tubing should be changed no more frequently than every 96 hours and at least every seven days. Tubing used for parenteral nutrition should be changed every 24 hours. The tubing used for blood must be changed every 4 hours. Tubing for fat emulsion infusion must be changed every 12 hours.

The tubing system must be labeled when it is hung with the date, the time it was opened, and the person's initials applying the tubing. The labeling allows everyone to identify when the tubing needs to be changed (Nettina, 2019).

Spiking and Priming

Spiking and priming the tubing are two processes that nurses should be familiar with. As discussed above, tubing delivers solutions such as fluids or medications to the bloodstream. Often, a pump can be used to assist with this process.

To spike an IV bag means to penetrate it with the spikey end of the tubing. There is a spiking port on the IV bag. Spiking this area will allow clear access for the bag's contents (fluid or medications) to go directly from the tubing to the patient without complications.

Priming the tubing means the contents of the solutions can flow through the tubing without air. Air must be removed as it can create an air embolism and harm the patient. The IV bag should be spiked first before the tubing is primed.

To spike an IV bag:

  • One should wash hands first and maintain an aseptic technique.
  • The tubing should be unpackaged and unkinked. The clamp should be rolled in the closed position.
  • Label the tubing with the date and time.
  • Open the IV bag packaging and hold the IV bag upside down in the non-dominate hand.
  • The stopper should be removed from the spiking port. It should be kept sterile.
  • The spike sleeve should be removed.
  • Insert the spike into the spiking port with a twisting motion.
  • Hang the IV bag on a pole.
  • The drip chamber should be squeezed until the chamber is half of the way full.
  • The clamp roller can be unclamped so the solution can go through the rest of the tubing.
  • Ensure there are no air bubbles in the tubing. If so, flick it to remove the bubbles. If this is unsuccessful, the line may need to be flushed again.
  • The tubing should be clamped shut.
  • It is ready to be connected to the patient and used.

All safety precautions, including standard ones, should be followed for safety reasons. Always wear personal protective equipment. Hand hygiene is essential, even if gloves are worn, and should be performed during all venipunctures. The skin can be palpated without gloves if it is not punctured or broken. However, hand hygiene must occur after, and gloves should then be worn (Doyle & McCutcheon, 2015).

Ensure that needles and hubs are single-use only and should be disposed of in a proper disposal container. Needles can never be recapped.

Gloves should be discarded in the appropriate areas.

Contaminated surfaces must be cleansed with proper cleaning items, such as a 10% bleach solution.

If a needlestick occurs, the area should immediately be washed, and the proper supervisors should be notified so further action can be taken.

To prevent potential patient harm, ask for two identifiers to verify the patient's identity.

Explain the process to the patient, ensuring that all details and reasons are provided. The order should be verified (Doyle & McCutcheon, 2015).

Flow Rates

The provider (doctor, physician assistant, or nurse practitioner) orders the flow rate. The nurse and the pharmacist's role is to evaluate the order's appropriateness based on the patient's condition. The nurse's role is also to regulate and maintain the flow rate and monitor the total input.

The nurse should notify the provider if the patient's rate does not seem correct. Considerations include age, patient condition, patient tolerance of the infusion, and the prescribed infusions.

The very young and elderly can easily experience fluid overload. The flow rate should be slower, or the patient must be carefully monitored.

The patient's condition will often determine the flow rate. Someone in hypovolemic shock requires a large amount of fluid. Someone with heart or renal failure requires restricted fluids.

Some medications cause vascular irritation (potassium chloride, Phenergan) or have the potential for an allergic response (antibiotics). These medications should be more diluted or infused slowly.

Some medications' efficacy is based on the administration time and infusion speed (antibiotics). Some medications must be titrated based on the patient's response (dopamine, nitroprusside, heparin).

An infusion pump controls the flow rate more efficiently and accurately; therefore, using a pump is considered the best practice. However, pumps are expensive; therefore, they may be a limited resource. Infusions not on a pump require more frequent monitoring of the flow rate. Flow control dials or clamps and occlusive clamps can slip or be dislodged. Another potential flow problem is the stretching and distorting of the tubing due to patient movement. Cold or viscous solutions can also cause flow fluctuations (Nettina, 2019).

Calculating IV Infusion Rates

Infusion rates are usually ordered as volume (mL) per hour.

An infusion pump measures the flow rate in mL/hours. To find the rate in mL/hour for an infusion pump, divide the total number of mL by the total number of hours (Nettina, 2019).

1000mL/8 hr = 125mL/hr (rate for an infusion pump)

When you regulate an IV flow rate with a clamp or dial controller, the rate will usually be measured in drips/minute. IV administration sets deliver a specific number of drops per mL. The number is on the package label. Standard drip sets deliver 10-20 drops/mL. Microdrip sets deliver 60 drops/mL, and blood sets usually deliver 10 drops /mL. Dial controllers may not be accurate if the IV catheter is less than a 20G.

A suggested formula for drips/minute (clamp or dial controller):

Total number of mL to infuse x drip factor (drops/mL) = flow rate (drops/minute).

Total number of minutes to infuse.

Example: Administer 1000mL of D5W over 8 hours using an infusion set that delivers 10 drops/mL.

1000 mL x 10 drops/mL = ? drops/min

8 hours x 60 minutes

1000 mL x 10 drops/mL = ? drops/min

480 minutes

2.08 mL/minute x 10 drops/mL= ? drops/min

20.8 drops/mL (21 drops/mL, round to nearest whole number)

Maintenance

Both short-term and long-term IVs require maintenance.

  • Flush the catheter with NS and aspirate blood before each infusion to assess catheter patency.
  • Flush the catheter with NS to clear the catheter lumen and prevent mixing with incompatible medications.
  • Flushing with NS is as effective as flushing with heparin to maintain catheter patency.
  • Flush 10 mL NS to remove fibrin deposits, drug precipitate, or other debris to ensure patency.
  • Locked catheters must be flushed before and after medication or solution administration.
  • Prefilled syringes are preferred for flushing rather than a nurse-filled syringe.
  • Use a push-pause method to inject the medication. Check the catheter for patency if resistance is met. Do not force.

Heparin is no longer routinely used to flush and maintain catheters. However, you may still hear the term heparin lock or hep-lock. Hep-lock refers to a catheter with a short tube that is connected to the IV but not to a fluid bag or bottle. The hep-lock allows the patient freedom when the IV infusions are intermittent (Nettina, 2019).

An aseptic technique is used to access a hep-lock or IV tubing. Clean the hub of the hep-lock or tubing with alcohol. Do not contaminate the cleaned hub. Remove the protective cover from the injection device or tubing and connect it to the hub. Most systems have needless connecting injection devices and tubing. If not, tubing connected by a metal needle should be taped to the tubing to prevent accidental removal.

The infusion pump has pressure limit defaults to prevent adverse effects. However, the upper limits may be manually increased based on the following:

  • The patient's activity level
  • The viscosity of the fluid/medication
  • The diameter and length of the catheter
  • The rate of fluid/medication being administered

Medications and solutions administered may be diluted, added to a burette, administered with an infusion pump, used in a syringe, or administered directly as a push or a bolus. The proper method of administration depends on the patient's circumstances and the type of catheter used.

The medication must be diluted into a smaller volume when using a burette. The fluid/medication should be hung, and the roller clamp should be slowly opened to allow some of the contents into the burette. An additive port can be used to inject the drug.

If a secondary infusion is necessary, it can occur through a bag or syringe, depending on the medication.

A syringe driver is often recommended for pediatric patients that weigh less than 10kg. The required volume of diluent should be drawn in a syringe. Pull back on the syringe to inject the medication into the syringe. Before accessing the additive port, it should be scrubbed and cleaned. A label with the drug, dose, volume, diluent, date, and time should be on the bag, as well as the nurse's signature.

For patients receiving intermittent transfusions, the disconnected IV lines should be discarded.

Before administration of fluids and medications, the cannula should be flushed. For patients who are not actively receiving fluid or medications through their IV line, it should be flushed at least once per shift. Sterile 0.9% sodium chloride should be used for flushing. A 10 mL syringe should be used for flushing as it prevents excess pressure and potential catheter rupture. If any resistance is felt when flushing, the patency should be reassessed.

Catheters should be flushed:

  • Directly after the catheter is placed.
  • Before and after the infusion of fluid or medications.
  • Before and after blood is drawn for the lab.
  • When the catheter dressing needs to be changed.

As dressings are pertinent for protecting against complications such as infection and dislodgement, they must be kept clean, dry, and secure. Any excess fluid or blood leakage indicates the need for a dressing change. If possible, a transparent film should be used unless the patient is allergic.

The old one should be removed carefully when changing the dressing, ensuring the cannula stays in place. The edges of the tape should be loosened slowly, staying close to the skin's surface. While changing the dressing, assess the insertion site. A 2% chlorhexidine and 70% alcohol swab should be used for cleansing the area as needed. The skin should completely air dry before applying the dressing.

A cotton ball or small piece of gauze can be placed under the catheter's hub to reduce pressure. An IV board or splint can help stabilize the extremity when activity and movement are expected. Ensure that the extremity is positioned and strapped in a neutral position to reduce the chance of injury. The splint should be assessed daily and if soaked with blood or drainage. Overall, everything should be secure, the site visible if possible, the tape should not be too restrictive, and the patient should be free from harm.

Document all care provided, especially when performing venipuncture and IV maintenance. Documentation should include information on the needle, the site, and each time it is assessed or care is provided, such as a dressing change.

As a note, extension sets should be changed when the insertion site is changed or if contamination and/or injury has occurred (Nettina, 2019).

Assessment

Assess the IV catheter at least daily for signs of infiltration, infection, phlebitis, or other complications. Also, remove if there are any signs of complications.

The insertion site should be assessed for signs of infection, including pain, swelling, and redness. The position of the catheter and the patency of the catheter should be assessed. The site should also be checked for any signs of extravasation, which can cause tissue damage and necrosis. Because pediatric patients are vulnerable, their sites should be checked hourly.

When assessing the dressing, ensure it is secure, intact, dry, and free of soaking blood. The bandages or dressings should not be so tight that it cuts off circulation, but also should not be too loose that it falls off, increasing the chances of catheter damage. The insertion site should always remain visible for assessment; transparent dressings can increase visibility.

If the patient has fluids or medications running through an IV, the fluid or medication, the infusion rate, and the equipment to infuse it should be assessed.

The catheter should be removed as soon as the patient no longer requires it; this prevents any further or unnecessary consequences (Nettina, 2019).

Removal

The peripheral IV catheter is removed when treatment is complete or a complication requires removal. To remove a catheter:

  • Stop all fluids or medications that are infusing.
  • While stabilizing the access device, lift the tape and secure the device.
  • Place a folded gauze over the insertion site.
  • Apply pressure to the insertion site as you pull out the catheter.
  • Hold pressure until the site stops bleeding.
  • Apply a dressing per the facility policy.
  • Educate the patient to watch for bleeding and refrain from using that arm to lift heavy items for 30 minutes.
  • Dispose of tubing and catheter per facility policy (Nettina, 2019).

Complications

There are complications following venipuncture and IV insertion that should be discussed (Nettina, 2019).

Infiltration is caused by the dislodgement of the catheter from the vein with an unintentional infusion into the surrounding tissue.

Extravasation is the infiltration of vesicant solutions into the surrounding tissue. Vesicants include chemotherapy, hyperosmolar solutions, parenteral nutrition, and potassium chloride.

Phlebitis is caused by the following:

  • Injury to the vein during venipuncture or prolonged catheter use
  • Catheter too large for the vein
  • Poor aseptic technique
  • Irritation to the vein because of rapid infusion or irritating solutions (smaller veins are more susceptible)
  • Clot formation at the end of the catheter due to slow infusion rates or inadequate hemodilution of infused medication or solutions
  • Phlebitis is more commonly seen with synthetic polyurethane catheters than with silicone catheters

Catheter-associated bloodstream infection is caused by:

  • Underlying thrombophlebitis
  • Contaminated equipment or solutions
  • Prolonged placement of the IV catheter, tubing, or solution container
  • Lack of aseptic technique with insertion or dressing changes
  • Cross-contamination from other infected areas of the body
  • Critically ill or immunosuppressed patients

Fluid overload is caused by the following:

  • The infusion of excessive IV fluids. The elderly, infants, and patients with cardiac or renal failure are at greater risk.

Air emboli are caused by:

  • When air enters the catheter during tubing change or catheter removal of a central venous line (negative intrathoracic pressure sucks in the air during inspiration)
  • Air in tubing delivered by IV push or infusion

Occlusion or slow flow is caused by:

  • Malposition of the catheter against the side of a vein or valve
  • Clot at the end of the catheter
  • External mechanical causes (kinking of tubing, clogged filter, needless connector)

Hemorrhage is caused by:

  • Loose connections of tubing or injection port
  • Inadvertent removal of the catheter
  • Anticoagulation therapy

Venous thrombosis is caused by:

  • Infusion of irritating solutions
  • Infection along the catheter
  • Fibrin sheath formation around the catheter with eventual clot formation
  • Patient factors such as:
    • Hypercoagulable state (cancer, diabetes, end-stage renal failure)
    • History of deep vein thrombosis
    • Surgical or trauma patients
    • Critical care patients
    • Extreme age
Complications (Nettina, 2019)
Infiltration
PreventionSignsIntervention
  • Select the best catheter and insertion site
  • Secure catheter and tubing
  • Splint site
  • Assess catheter for patency prior to use
  • Discomfort or pain
  • Swelling
  • Blanching
  • Coolness of surrounding tissue
  • Slows or quits flowing
  • Absence of blood backflow
  • Stop infusion
  • Disconnect tubing
  • Remove catheter
  • If severe, apply warm compress and elevate site
Vesicant Extravasation
  • Same as infiltration
  • Same as infiltration
  • Infusing a vesicant solution
  • Stop infusion
  • Disconnect tubing
  • Do not remove catheter
  • Apply dry cold compress
  • Contact provider
Phlebitis
  • Secure catheter and tubing
  • Splint site
  • Assess catheter for patency before use
  • Use large vein for irritating infusion
  • Adequately dilute irritating medications
  • Discomfort and pain that will progress along the path of the catheter and vein
  • Redness, swelling, warmth, induration
  • Purulence
  • Redstreak above site
  • Palpable venous cord
  • Apply warm compress
  • Elevate site
  • Consider removing the catheter
  • Consider pharmacological interventions (analgesic, anti-inflammatory, corticosteroids)
Catheter-associated bloodstream infection
  • Adhere to hand hygiene
  • Use aseptic technique
  • Clean site appropriately
  • Change tubing as recommended
  • Maintain integrity of the administration system
  • Use dressing that allows visualization of the site
  • Signs of local infection
  • Fever, chills
  • Nausea, vomiting
  • Elevated white blood cell counts
  • Malaise, tachycardia
  • Backache, headache
  • May progress to septic shock with profound hypotension
  • Stop infusion
  • Consider removing the catheter
  • Get a sample of any exudate for possible culture
  • When removing the catheter, cut off the tip with sterile scissors and place it in a sterile dry container for possible culture
  • Start appropriate antibiotic therapy
Circulatory overload
  • Assess for cardiac or kidney conditions
  • Be vigilant in high-risk patients
  • Monitor infusion rate
  • Use electronic infusion device in high-risk patients
  • Keep accurate intake and output
  • Splint the site if the flow rate fluctuates too widely with movement
  • Increased blood pressure and pulse
  • Increased central venous pressure, venous distention, engorged jugular veins
  • Headache
  • Anxiety
  • Shortness of breath
  • Tachypnea, coughing
  • Pulmonary crackles
  • Chest pain
  • Notify the provider
  • Sit the patient up to ease breathing
  • Reduce IV infusion rate
  • Monitor for worsening condition
Air Embolism
  • Clear all air from tubing before infusion
  • Change solution containers before they run empty
  • Ensure all connections are secure
  • Use Luer-lock connections or administration sets with air-eliminating filters unless contraindicated
  • Use the correct technique when removing central venous access devices
  • When removing the central venous device, place the patient in supine or Trendelenburg position (unless contraindicated) so the insertion site is at or below the level of the heart
  • Instruct the patient to bear down (Valsalva maneuver) during catheter removal
  • Sudden onset of dyspnea, breathlessness and tachypnea
  • Chest pain, hypotension tachycardia
  • Altered mental status, altered speech
  • Change in facial appearance, paralysis
  • Immediately prevent additional air from entering the bloodstream by closing, kinking, clamping, or covering the existing device or insertion site with an air occlusive dressing
  • Immediately turn the patient to the left side and lower the head of the bed. This will trap air in the right side of the heart
  • Notify the provider immediately
  • Administer oxygen as needed
Occlusion or sluggish flow
  • Assess the functionality of the vascular access device routinely
  • Use appropriate flushing procedures
  • Secure the IV with tape and armboard if needed
  • Unable to withdraw blood or sluggish blood return
  • Sluggish flow or frequent occlusion alarms
  • Signs of infiltration or extravasation
  • Assess for mechanical causes of occlusion
  • Reposition the catheter by pulling back slightly on the cannula in case the cannula is against a wall or valve
  • Lower the solution container below the patient's heart and observe for blood backflow
  • Assess the functionality of the electronic infusion device
  • Consider removing the device
Hemorrhage
  • Cap all central lines with Leur-lock adapters and connect Leur-lock tubing to the cap, not directly to the line
  • Secure catheters
  • Use a transparent dress if possible
  • Tape the remaining tubing in a loop, so tension is not directly on the catheter
  • Keep pressure on sites where catheters for been removed
  • Anticoagulated patients must keep pressure for at least 10 minutes
  • Oozing or trickling of blood from insertion site or catheter
  • Hematoma
  • Apply direct pressure
Venous thrombosis
  • Select appropriate vascular access device and site location
  • Ensure proper dilution of irritating substances
  • Ensure proper placement of vascular access device
  • Institute nonpharmacological strategies for thrombosis prevention if possible (early mobility, adequate hydration)
  • Anticoagulant prophylaxis if ordered
  • Swelling and pain around the IV or in the extremity proximal to the insertion site
  • Slowing of IV infusion or inability to draw blood from the central line
  • Palpable lump in the cannulated vessel
  • Notify provider
  • Anticipate therapeutic anticoagulant dose

Venipuncture in Children

Venipuncture is a scary and stressful experience for a child. Even though it is a routine procedure, needles can be scary. Ensuring the approach is calm may help to ease the stress and anxiety of routine venipuncture.

There are ways to ease the stress for children. First off is a distraction; this may be a good method that can be performed by the nurse or by the parents/caregivers. Positioning may decrease anxiety. However, if a child cannot see what is happening, it may increase anxiety. The use of music has been researched and shows it helps to ease stress. Family involvement in the process is crucial as they provide great comfort. If the child is fearful of pain, topical analgesics can be used.

Research has also shown that oral sucrose can be used in patients younger than six months old.

Education is just as important for children as it is for adults. Assure the child that the blood loss will not be harmful to them. In fact, a Band-Aid with cool designs may reassure the child that they will not bleed too much. However, bandages must be used cautiously in children who may remove them and try to swallow them.

Skin preparation is often performed in different ways. Chlorhexidine, isopropyl alcohol, and povidone-iodine have all been used. Though they each have benefits, disadvantages do exist. Follow policy protocol for skin preparation (Elsevier, 2022).

Education

Education should be provided based on the age of the patient and the circumstances. Ensure the patient is capable of understanding the information they will be told. Use terms and words they can comprehend, depending on their age and education level.

  • Explain the procedure to the patient, including the reason, the steps, and the results.
  • Explain to the family the same information and provide ways they can assist.
  • Explain that small amounts of pain may be expected, and ensure the family also understands this.
  • Identify ways to decrease pain and anxiety.
  • Explain occurrences that should be reported, such as excess bruising and pain that does not go away.
  • Explain ways the patient can make the process easier and quicker, such as sitting still.
  • Encourage patients and family members/caregivers to ask questions (Elsevier, 2022).

Assessment

  • Hand hygiene should be performed before going into the patient's room. Use personal protective equipment as necessary.
  • The nurse should introduce themselves to everyone in the room.
  • Verify the patient is correct using two identifiers.
  • Assess the child's developmental level and ability to understand the procedure.
  • Assess the history of the procedure, if it has ever been done before, and how the child reacted. The assessment will help determine if topical analgesia is necessary.
  • Assess for conditions that could complicate the procedure, such as anemia or bleeding disorders. Also, assess why the patient is there, such as infection, injury, and any personal history limiting where venipuncture can be performed, such as shunts or grafts.
  • Identify if there are any specifics on the orders that should be addressed, such as fasting restrictions. Review the medication history.
  • Assess the hydration status, as this can complicate venipuncture if the patient is not hydrated.
  • Determine the patient's and family's ability to cooperate and assist with the procedure (Elsevier, 2022).

Preparation

  • Verify the order. Verify the identity of the patient.
  • Identify any special requirements for the procedure.
  • Assemble equipment. Note: Use a small volume syringe to prevent vein collapse.
  • If topical analgesia cream is used, ensure it is applied with gloves. Ensure there is time for the analgesia to work before beginning the procedure.
  • Explain the procedure as discussed above.
  • Ensure adequate lighting.
  • Identify the preferred site. The veins in the hand, the forearm, or the antecubital area can be used. The scalp veins or the feet may be used if the patient is an infant. If possible, avoid using the dominant or preferred hand in pediatric patients. Ensure the site is well-perfused and warm. A cooler extremity may prevent successful venipuncture.
  • Position the patient and begin to use distraction techniques. The family/caregiver can keep hold of the extremity, making it easy to get to. They may also hold the patient, which ensures comfort and helps keep the patient still.
  • Avoid using a bottle in an infant while the procedure is being performed, as it can enhance the risk of choking if the infant becomes upset.
  • Palpate the site for a vein. If necessary, use a tourniquet. However, limit the time the tourniquet is applied to prevent injury and hemolysis.
  • Prepare the venipuncture site. Cleanse the site with an isopropyl alcohol solution and allow it to air dry.
  • If using a butterfly needle, hold it by the wings. A slight angle should be used to enter the vein. It allows for a controlled entry. Entry the vein using a quick but small thrust; this also assists with a controlled entry. A popping sensation may be felt.
  • Verify the entry of the vein by observing for a flashback. If there is no return, follow the steps listed above for an adult.
  • Withdraw the blood needed for lab tests.
  • If a tourniquet was applied, release it before moving the needle. A clean gauze or 2x2 should be applied, then withdraw the needle.
  • Immediately apply pressure over the site until the bleeding stops. The family member may be the one to apply the pressure.
  • If blood is collected, ensure it arrives at the appropriate place properly. It should be labeled.
  • An adhesive should be applied after the bleeding is controlled.
  • Reward the patient for their cooperation and participation.
  • Discard equipment and personal protective equipment.
  • Document the procedure, intervention, and assessment.
  • Monitor the site after for bleeding or complications (Elsevier, 2022).

Expected Outcomes

  • Optimally, successful venipuncture should be performed with one attempt.
  • Blood is collected successfully, and laboratory tests can be performed.
  • The patient/family's anxiety is minimalized or resolved.
  • No complications from venipuncture arise.

However, unintended outcomes may occur and include:

  • More than one attempt at venipuncture.
  • Increased stress and anxiety that cannot be managed.
  • Lack of blood return.
  • Contaminated or hemolyzed specimen.
  • Site infection and excessive bleeding (Elsevier, 2022).

Documentation for IV Therapy in Children

Documentation should include the following: 

  • Date and time of the procedure.
  • Specimens obtained and procedures performed with the specimens.
  • Equipment used for the procedure- the type of needle and gauge.
  • Who attempted the insertion(s), and the number of attempts.
  • Site and site assessment.
  • Patient's tolerance of the procedure.
  • Outcomes.
  • Education provided (Elsevier, 2022).

Tips

There are some general tips to follow if venipuncture or blood samples are unsuccessful.

The patient or the needle may need to be repositioned.

The collection tube may not be up against the back of the needle/the hub.

The vacuum seal in the tube could be defective, and another tube should be tried.

The tourniquet may be too tight.

Probing can be damaging to the vein and harmful or painful to the patient. Depending on the patient and the circumstance, they should not be stuck more than twice by the same person (Nettina, 2019).

Documentation

General documentation of IV therapy should include the following:

  • Date and time of insertion
  • Site and preparation of insertion
  • Number of attempts to start IV
  • Size and type of catheter inserted
  • Medications and solutions hung
  • Total intake of IV fluids
  • Date and time of removal
  • Management of complications

Patient education should include the following: 

  • Plan of care and goal of treatment
  • Purpose of IV
  • Care of the IV devices and insertion site
  • Potential complications (Nettina, 2019)

Case Study

Jessie is a phlebotomist who works in the laboratory department, often assisting with blood draws for patients in the emergency department.

Jessie has received a call about Ethel, a 72-year-old female in the emergency department with complaints of nausea, vomiting, diarrhea, and intermittent stomach pain for three days.

The emergency department sees Ethel within thirty minutes of her arrival. A nurse examines the patient and decides that the patient will need blood work and scans. Because the patient's hydration has been affected by nausea and vomiting, she will likely need fluids replaced. Instead of sticking her twice, once for blood and once for an IV, the plan is to place an IV and draw labs simultaneously.

The nurse is having difficulty finding veins. She has tried a tourniquet, fist-pumping, and the use of gravity. The lack of hydration probably contributes to the difficulty in finding veins. The nurse tries to stick a 20G into the left antecubital area, but there is no flashback. The nurse tried a different syringe and also tried repositioning the arm. Still, there was no blood return. She tried to flush the catheter but was met with resistance.

The nurse decides to withdraw the needle and try again elsewhere. She spots a vein in the left hand that she thinks may work. She starts at a 40-45° angle with a 20G needle and pushes when she feels she is in the vein; she receives a small drop of blood return, but no more. The patient begins complaining of pain and burning, and the skin is visibly bruising. It is likely that she has gone through the vein wall on both sides, blowing the vein. The nurse withdraws the needle and decides to call Jesse.

Jesse makes his way to the emergency department and examines the veins on Ethel's arms. He has Ethel lay in bed and dangle her right arm off of the bed. While doing so, he also has her slowly pump her fist. He can palpate a vein in the right antecubital area. Jesse starts at a 20° angle as it is a deeper vein. He gets flashback and can withdraw blood and finish starting the IV, easily flushing NS through the vein.

What could the nurse have done differently? Was it just the luck of the draw? It is very possible that if the nurse's angles were changed, she would have gotten blood return and not blown the vein.

Conclusion

Venipuncture is a procedure that is commonly performed in many different settings. Because venipuncture can be complex, certain information must be reviewed. First, background information must be given about the skin and veins. Because our skin is the barrier against protection, any time it is broken, the risk of infection increases, including with venipuncture- this is why it is essential to try and obtain successful venipuncture in one attempt. Because the arterial system is also very complex, nurses should ensure adequate knowledge of arteries, veins, and capillaries.

It is also important to understand the types of tests that can be performed with blood. For example, blood chemistry panels can be run to determine electrolyte levels and minerals. Blood lipid profiles can be performed to monitor good and bad cholesterol. Liver function tests can be performed to determine the level of functioning of the kidney. These are just a few examples of the information that our blood can tell us.

How blood tests are taken and how the results are configured are also important. There are many different tubes with various colored tops. Each top represents additives and the types of tests that can be run. Blue top tubes are for hematology tests, yellow tops look at hormones, tumor markers, and blood toxicology levels, and tubes with dark green tops look at insulin and renin. These are just a few examples of color indicators with blood tubes.

Another important aspect of venipuncture is the collection of blood cultures, which are essential in identifying bacteria in the blood. The collection of blood cultures must be performed in an aseptic and proper manner. Collecting the right amount of blood is necessary to determine the type and growth of bacteria.

The insertion of an IV needle and catheter must require a proper technique to reduce the risk of complications. Several factors should be reviewed before insertion. The catheter size, the type of solution, the vein and its condition, the duration of therapy, the age and status of the patient, and the patient's preference and activity should all be considered before the insertion procedure. There are advantages and disadvantages to each insertion site. For example, the inner wrist is excellent for butterfly needles. However, it usually results in a painful insertion for the patient. The antecubital veins allow for rapid infusions because of the size of the vein. However, they restrict the patient's motion. The advantages and disadvantages and risks and benefits must be reviewed with the patient.

After an insertion site has been decided, it is time to prepare the equipment. Depending on the site and circumstances, additional equipment may be needed. However, basic equipment includes safety needles, syringes, tape, bandages, a tourniquet, and gauze. The site should also be prepped, thoroughly cleaned, and allowed to air dry.

Depending on the location of the site, different angles of insertion should be used. For example, the deeper the vein, the steeper the approach could be. A deep vein should be done with at least a 20-30° angle.

It is possible that vein finding can be tricky, but there are methods to find or distend a vein, such as ultrasound, gravity, or hydration.

If no flashback is received, tips and tricks, such as positioning, may allow a flashback. However, if the tips do not work and continual resistance is met, the needle is not in the right place, and the catheter is not patent.

After placing a catheter, the site can be used for venipuncture, infusion, or as needed. When infusions are ordered, the tubing should be correctly used. Tubing should be primed, and bags may need to be spiked. Follow facility protocol with these procedures.

Flow rates and infusion rates must be calculated correctly to prevent patient harm. Infusion rates are usually ordered as volume (mL) per hour. An infusion pump measures the flow rate in mL/hours. To find the rate in mL/hour for an infusion pump, divide the total number of mL by the total number of hours. If the rate seems incorrect, have someone else double-check and confer with the provider.

For patients who will have insertions long-term, regular maintenance should occur. Maintenance includes ensuring the catheter stays patent with flushing. Assessment of the catheter includes looking for infection and infiltration. Complications include infiltration and extravasation, phlebitis, circulatory overload, and air embolism.

Venipuncture in children requires a different approach. Steps should be taken to ensure that the pediatric patient is educated about the procedure and that their anxiety/stress is calmed. The family should be involved in the procedure as much as possible; this can decrease anxiety for the child. Precautions should be taken when performing venipuncture or an insertion in infants, as they can easily and accidentally pull out the catheter.

A lot of information on venipuncture and maintenance has been provided. It is important to review facility protocols and policies to follow their guidelines and regulations. Protocols should outline hand hygiene and an aseptic technique for certain procedures, which is always a critical component of care. No matter the procedure, ensure patient understanding and patient comfort. Always explain the steps of any procedure to maximize the patient's understanding while minimizing their anxiety.

Select one of the following methods to complete this course.

Take TestPass an exam testing your knowledge of the course material.
OR
No TestAttest that you have read and learned all the course materials.

Implicit Bias Statement

CEUFast, Inc. is committed to furthering diversity, equity, and inclusion (DEI). While reflecting on this course content, CEUFast, Inc. would like you to consider your individual perspective and question your own biases. Remember, implicit bias is a form of bias that impacts our practice as healthcare professionals. Implicit bias occurs when we have automatic prejudices, judgments, and/or a general attitude towards a person or a group of people based on associated stereotypes we have formed over time. These automatic thoughts occur without our conscious knowledge and without our intentional desire to discriminate. The concern with implicit bias is that this can impact our actions and decisions with our workplace leadership, colleagues, and even our patients. While it is our universal goal to treat everyone equally, our implicit biases can influence our interactions, assessments, communication, prioritization, and decision-making concerning patients, which can ultimately adversely impact health outcomes. It is important to keep this in mind in order to intentionally work to self-identify our own risk areas where our implicit biases might influence our behaviors. Together, we can cease perpetuating stereotypes and remind each other to remain mindful to help avoid reacting according to biases that are contrary to our conscious beliefs and values.

References

  • Beecham, G.B., & Tackling, G. (2022). Peripheral Line Placement. In: StatPearls [Internet]. Treasure Island (FL): StatPearls Publishing. Visit Source.
  • Bond, M., Crathorne, L., Peters, J., Coelho, H., Haasova, M., Cooper, C., Milner, Q., Shawyer, V., Hyde, C., & Powell, R. (2016). First do no harm: pain relief for the peripheral venous cannulation of adults, a systematic review and network meta-analysis. BMC anesthesiology, 16(1), 81. Visit Source.
  • Doyle, G. R., & McCutcheon, J. A. (2015). 8.4 priming IV tubing and changing IV fluids and tubing. Clinical Procedures for Safer Patient Care. Visit Source.
  • Elsevier. (2022). Clinical skills │ blood specimen collection: Venipuncture (pediatric). Elsevier. Visit Source.
  • Lamy, B., Dargère, S., Arendrup, M. C., Parienti, J. J., & Tattevin, P. (2016). How to Optimize the Use of Blood Cultures for the Diagnosis of Bloodstream Infections? A State-of-the Art. Frontiers in microbiology, 7, 697. Visit Source.
  • Lee, S. M. C., Martin, D. S., Miller, C. A., Scott, J. M., Laurie, S. S., Macias, B. R., Mercaldo, N. D., Ploutz-Snyder, L., & Stenger, M. B. (2020). Venous and Arterial Responses to Partial Gravity. Frontiers in physiology, 11, 863. Visit Source.
  • Nettina, S. M. (2019). Lippincott manual of nursing practice (11th ed.). Wolters Kluwer.
  • National Heart, Lung, and Blood Institute. (2022). Blood Tests. National Heart, Lung, and Blood Institute. Visit Source.
  • Ombelet, S., Barbé, B., Affolabi, D., Ronat, J. B., Lompo, P., Lunguya, O., Jacobs, J., & Hardy, L. (2019). Best Practices of Blood Cultures in Low- and Middle-Income Countries. Frontiers in medicine, 6, 131. Visit Source.
  • Rosso, J. D., Zeichner, J., Alexis, A., Cohen, D., & Berson, D. (2016). Understanding the Epidermal Barrier in Healthy and Compromised Skin: Clinically Relevant Information for the Dermatology Practitioner: Proceedings of an Expert Panel Roundtable Meeting. The Journal of clinical and aesthetic dermatology, 9(4 Suppl 1), S2–S8.
  • Tucker, W.D., Arora, Y., & Mahajan, K. (2022) Anatomy, Blood Vessels. In: StatPearls [Internet]. Treasure Island (FL): StatPearls Publishing. Visit Source.
  • University of North Carolina (UNC) Medical Center. (2021). EVACUATED BLOOD COLLECTION TUBE GUIDE. UNC Medical Center. Visit Source.